Monday Jan 27
.To Read: Online: What File Format do I Use? & textbook Chapter 6: Value
.To Do: Bring a large photo to repair for Project #1 (Due Mon. Feb. 3)
.COMPLETE: Photoshop Essential Training (See Skill Set 1 in the Training Tab) at lynda.com
Chapters 3, 5, 6, 7, 15
.To Read: Online: What File Format do I Use? & textbook Chapter 6: Value
.To Do: Bring a large photo to repair for Project #1 (Due Mon. Feb. 3)
.COMPLETE: Photoshop Essential Training (See Skill Set 1 in the Training Tab) at lynda.com
Chapters 3, 5, 6, 7, 15
You will notice on the tab page for MODULE 1 that classes include a lectures that have accompanying Powerpoints. You can PERUSE, download, or access these ahead of time for Lecture Notes. This first week of Lectures includes these Powerpoints:
-Intro to Digital Imaging
-The Design Process
-Basic Photo Composition
-Romanticism vs. Realism
-Intro to Adobe Platform
-Value (zip file)
Also, from PART B: (not tested on till Quiz 2)
-Color Theory
-Composition & Balance (a review)
____________________________
PRACTICE 1 BELOW WILL BE DUE Monday Jan 27 AT THE END OF CLASS.
PRACTICE 1
(3 points)
Crop a Photo 3 ways in Bridge…
Artistically Enhance the Photo 3 ways in Photoshop….
Crop a Photo 3 ways in Bridge…
Artistically Enhance the Photo 3 ways in Photoshop….


 Take a large and resolute image (at least 768 x 1024 pixels at 72 dpi) containing distinctive Foreground, Midground, and Background (see the PPT "Basic Photo Composition" for more information on these concepts).
Using Adobe Bridge, open the photo in “camera raw.” Crop (and enhance) the photo several different ways to create at least 3 “new” images that each “tells a different story.” In each instance do appropriate sharpening, contrast, and color changes to improve/change the resulting image as a resolute, clear photo. Save each image under a different name to your folder on the server.
Next, open each of your 3 new images in Photoshop and drastically change the color or appearance for each to create 3 additional images that are more artistic or abstract in nature (versus photo-realist). Use appropriate filters like ACCENTED EDGES or PAINT DABS or change the color balance or to black and white to make the photo "say" something different. Convert and save all 6 photos as tiffs with 240 dpi (resampling if needed) and drop them along with a copy of the original photo into your folder (identified by your name) in the student dropbox on the public server. (Choose Go/Connect to Server from the finder or hit command K and type in "afp://artserverX6.local" then when prompted sign in as "student" with no password and navigate to ServerHD1 and the class folder "+Art109-Hanger")
This exercise will be evaluated on the following criteria:
• Choice of Photo
• Composition(s)/Storytelling
• Attention to Detail
• Attention to Clarity
• Enhancement(s) you make
• Creativity
The final product should also demonstrate your understanding of effective resolution by avoiding pixelated images.
Practice 1 Evaluation Rubrics
For Wednesday Jan 29
.To Read: Chapter 8: Color, & Chapter 9: Using Color
Plus (online):
COLOR THEORY Website (ONLINE/be sure to click on and read all of the first 12 links!): Color BasicsColor Systems | Color WheelComplementary Colors | After Images | Color Combinations | Color & Contrast | Itten's Contrasts | Proportion & Intensity | Contrast & Dominance | Shades & Tints.To Do: Work on Assignment 1: Before & After Project
PLUS< Complete ALL of PS Video Tutorials SKILL SET 1 by end of class
Begin Skill Set 2, "Essential Training" in class
Before proceeding to the Assigned Projects,
you should have completed Skill Set 1 in the Training tab.
Assignment #1 Guidelines
Before and After Photo Repair Project
(5 points)
you should have completed Skill Set 1 in the Training tab.
Assignment #1 Guidelines
Before and After Photo Repair Project
(5 points)
 |
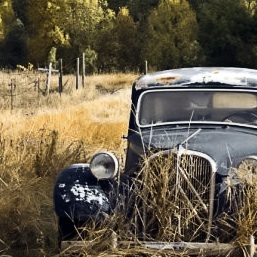
| Photo Repair by Leslie Chelala |
 |
Repair/Improve a damaged or inferior photograph...
This is an assignment in the use of the global adjustment features of Adobe Bridge plus healing tools and local adjustments in Photoshop. In this assignment you are primarily evaluated on your understanding of value.
Choose a photo of your own that needs repair or significant improvement. Your finished photo should show several significant enhancements from the original. Appropriate enhancements include:
- • Adding detail to an area blown-out in the original
- • Simplifying or dramatizing a light source
- • Noticeably adjusting all-over or area contrast, color & value
- • Masking, burning, dodging areas to fix blemishes, scratches, tears, & stains
- • Improving skin tone
- • Diffusing or softening image for aesthetic reasons
- • Adding clarity, sharpening, or improving resolution
- • Straightening a horizon line
- • Purposefully canting an image (angling) for dramatic effect
- • Reducing noise
- • Retouching a portrait for aesthetic reasons
- • Converting from color to Black/White or Duotone
- • Cropping and enhancing a detail to create a new photo
- • Significantly adjusting saturation, vibrancy, luminance, or gain
(I would expect to see at least 5 of the above.)
Pay particular attention to aesthetics, value (contrast/color balance), vibrance, mood, and clarity of detail. You will be evaluated on:
- Choice of Image/Originality
- Composition/Cropping Choices
- Color Aesthetics
- Contrast/Value
- Complexity of Work/Software Skill
- Clarity/Final Image Resolution /Proper File Format
- Use of PS Filters
- Use of PS Healing Tools
- Blending/Transparency of corrections/healing:
- Finesse/Attention to Detail/Creativity
Load the original photograph and your final PS file (with the layers intact) in your folder in the student drop box on Student Server 8 before class the day of the critique (even if still in progress!) and email a final JPG version of the finished art to me (after the critique) to let me know it is ready for evaluation. You should briefly note in your email what changes were made to the image, how, and why. As with all Art 109 projects, when you send a file by email be sure your name is somewhere in the file name. If your name is not in the file, it will be rejected.
REMEMBER TO WORK LARGE (1024x768+) in 200-300 dpi. Tiff format is best
Assignment 1 Evaluation Rubrics
REMEMBER TO WORK LARGE (1024x768+) in 200-300 dpi. Tiff format is best
Assignment 1 Evaluation Rubrics
RESOURCES...
PHOTO SOURCES...
No comments:
Post a Comment