That said, there were a few questions regarding InDesign that came up the week of finals--and a couple students have since asked me to answer some more questions. So, I thought I'd send this useful info to all of you.
Below are common problems students encounter with indesign. Hope it helps you as a reference. (You can also always email or text me (305) 646-8046 with those little questions too.) Have a great summer!
~Prof. Hanger
CHANGING TO INCHES OUT OF PICA MEASUREMENTS
Go to InDesign in the top menu
Choose PREFERENCES/UNITS & INCREMENTS
Under Ruler Units/Horizontal, Vertical change picas to inches from the drop-down menu
SAVE FILE AS JPEG or PDF
You must choose "EXPORT" from the file menu, then choose your preferred format to save as a copy. Note that there are two choices for PDF (interactive and print). For these assignments you want to choose Print.
ADDING PRINTERS MARKS
When an InDesign document is to be professionally printed, you need to add certain marks to assist the printer with making the 4 negatives that make up the 4-color process. These consist of:
crop marks: tell the printer where the page edge is to trim
registration marks: allow the printer to line up the four negatives (one ea. for black, yellow, cyan, magenta) precisely before burning plates
color bars: assist the printer in matching ink combination colors to your original color choices
TO ADD THESE MARKS: When you export as PDF for PRINT, (from FILE/EXPORT/ and choosing ADOBE PDF (PRINT) in the Format drop down menu) a dialogue box appears with several choices. On the left click "MARKS AND BLEEDS." Simply check "ALL PRINTERS MARKS" at the top and if you have any colors, art, or photos that bleed off the page (i.e.. run to the page edge) check either USE DOC BLEEDS (if you never set these up in the document, go back and do it now.) All artwork that bleeds to the edge of the page must include at least a 1 pica or 1/8-1.4 in. "extra" bleed beyond the edge of your document to allow for printer trim errors
When exporting to PDF always check your exported document that it reads accurately before emailing it. If your facing pages aren't facing in the PDF Reader, don't panic. That's simply an Adobe Acrobat prefernece (VIEW DOUBLE PAGES).
For more on printers marks, go to:
http://help.adobe.com/en_US/indesign/cs/using/WSa285fff53dea4f8617383751001ea8cb3f-7088a.html
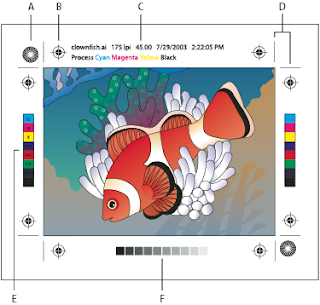
PRINTERS MARKS EXPLAINED:
For more on printers marks, go to:
http://help.adobe.com/en_US/indesign/cs/using/WSa285fff53dea4f8617383751001ea8cb3f-7088a.html
PRINTERS MARKS EXPLAINED:

A. Star target
B. Registration mark
C. Page information
D. Trim marks
E. Color bar
F. Tint bar
B. Registration mark
C. Page information
D. Trim marks
E. Color bar
F. Tint bar
PACKAGING IMAGES/FONTS SO LINKS DONT BREAK: If you are working on mutiple computers, when finished working on an inDesign document you should package it with your images, links, and fonts so it can be read on other PCs (such as mine or your printers). When you do this, Adobe places the objects in a folder you name and that you can send off with an Id file.
To package your document inDesign, first save it, then go to FILE and click PACKAGE on the menu bar. Click PACKAGE again in the resulting dialogue box, give your package folder a name, save it on the same drive as your document, and click again.
HOW CAN I SEE MY DOCUMENT AS IT WILL LOOK WITHOUT GUIDELINES WHEN PRINTED?: From the VIEW menu go to SCREEN MODE and choose PREVIEW.
No comments:
Post a Comment